Showing posts with label technique. Show all posts

Thursday, August 19, 2010

Video - 3 Mistakes lifter make building muscle

Looking to get Big and Strong in the Gym

I have a quick video for you today. Looks of guys in the gym plateau and fail to get big and strong or build any new muscle.

This may because you are making one of these common mistakes in your workout program.

Building muscle can be done by anyone as long as you know what you are doing.  This video will point out 3 of the more common mistakes made and some quick fixes.

For more information be sure to get your free report from the link below.


Grab your free report

Friday, July 30, 2010

Looking to Add Muscle in the Gym - 5 Muscle Building Tips

Are you looking to add more muscle mass...

 5 muscle building tips to help you get bigger and stronger in the gym.

I put up 5 tips to help you build more muscle, click the link below to check it out.

Click Here -- >>  5 Muscle Building Tips

 These five mass building tips can be implemented in your next workout. They are simple and easy to apply to your current training program. Be sure to check them out, use them, and build a healthy more muscular body.

Click Here -- >>  5 Muscle Building Tips

Saturday, March 13, 2010

Are you Strong To The Core?

This is an interesting article written by my friend Nick Nilsson. This is a good little article abou core strength and improving your weightlifting performance as well as your sports performance. Plus a good strong core can help eliminate back pain. Nick gives you 2 core exercises for a good strong midsection.


If you were to ask me which muscle group in your entire body you could work to get the greatest benefits in the shortest amount of time, I would tell you without hesitation, "the core." Strengthening the core can realize tremendous benefits to anyone regardless of his or her training experience and can do so very quickly.

But what is the core?

The core, as it's known in strength training circles, consists of all the muscles in your abdominal and lower back areas. This includes all the abdominal muscles (rectus abdominus, internal and external obliques, transverse abdominus and intercostals) as well as the muscles associated with the spine (the erector spinae group) and the hip flexors (iliacus and psoas, collectively known as the iliopsoas).

These muscles all work in harmony to provide stabilization for your body and to transfer power from the legs to the upper body and vice versa. The core muscles also function to keep your insides in, where they belong!

And why is strengthening the core so important?

Weak core muscles contribute to all kinds of problems in the body, the most prevalent of which is lower back pain. By strengthening the muscles that help support the spine and improve posture, you can dramatically decrease the symptoms of lower back pain.

Picture your spine as a column of soda cans stacked one on top of the other. If you wanted to keep that column standing up under stress, what do you think would work better: a "tenser" bandage (as is used for wrapping injured ankles) or Scotch tape? Sure the tape would keep the cans together but the cans wouldn't receive a whole lot support, would they?

When you strengthen the muscles of the core, you are in effect turning that Scotch tape into a nice, tight "tenser" bandage, increasing the amount of support that your spine gets.

Core training also has the potential to greatly improve sports performance. Watch a baseball pitcher throw a pitch in slow motion. The power of the throw starts at the legs, gets transferred through the abdominal area (a.k.a. the core) then ends up in the arm where the ball is released. Imagine how much speed and power would be lost from that throw if the core muscles couldn't efficiently transfer the force from the legs to the throwing arm.

The core is the one area of the body that will always give you a great return on your investment.

So how do I train my core muscles?

Exercises that work the abdominals and the lower back are the staples of core training. Also, exercises that target the stabilization and power-transfer duties of the core muscles are very effective.

The most basic abdominal training exercise is the standard crunch. You can go to the following URL to see the proper technique for this exercise:

http://hop.clickbank.net/?xxxxx/betteru&l=1017

But I've got an exercise for you that blows the standard crunch right out of the water. The equipment required for this exercise: one rolled-up towel.

The exercise is known as the Abdominal Sit-Up. It uses a sit-up-like movement but focuses directly on the abdominal muscles rather than the hip flexors (which a regular sit-up does). It is also very safe for your lower back. Another advantage it has over the standard crunch is that it targets the stretched (arched back) range of motion of the abs, which is totally missed in standard floor crunch.

How To Do It:

Lie on your back on the floor. Roll up a towel or mat and slip it underneath your lower back, just above the waistband (the size of the towel affects your body position during this movement - use a fairly large towel).

Your knees should be bent about 90 degrees. Keep your feet close together and knees fairly wide apart. This prevents the hip flexors from having a direct line of pull, helping to minimize their involvement.

Do not anchor your feet or have someone hold them down. This automatically activates the hip flexors. You will get the most out of this exercise by minimizing their involvement.

The difficulty of this exercise depends on where you hold your hands. The hardest position is above your head at arms-length, then beside your head, then across your chest, then straight down between your legs or at your sides. Start with the easiest first then progress to the other positions as you get stronger.

You are now ready to begin.

* Keeping your torso straight and stiff, start the sit-up by tightening your lower abs then lifting your upper body off the floor.
* As you continue up, imagine trying to push your face up against the ceiling (think up, not around).
* When you reach about 25 to 30 degrees above horizontal, hold there for a second or two and squeeze your abs hard.
* Keep your lower back in contact with the towel at all times and always maintain tension in the abs.
* Lower yourself down slowly and under control. Do not just drop back to the ground. The negative portion of this exercise is extremely effective.
* Remember to adjust your arm position depending on the strength of your abs (see above).

You can see pictures of how this exercise is done by going to:
Incline Ab Sit-Ups

If you are a beginning trainer, this is a good starting variation of the Abdominal Sit-up.

Set an incline sit-up board to a slight incline. If you don't have an incline sit-up board, you can use an adjustable incline bench, a decline bench, a Step platform with a riser under one of the ends or a flat bench with something under one end. You can even use a propped-up 2 x 6 board!

Your head should be on the higher end with your feet placed on the floor.

The execution is exactly the same. The only difference is that the tension on the abs is much less due to the greatly improved leverage in this position, allowing even people feel that their abs aren't strong enough to do the exercise.


Lying Superman Raises - An Exercise For The Lower Back

Though this exercise has a rather unique name, it is an excellent strengthening exercise for the lower back that you can do almost anywhere.

How To Do It:

Lie face down on the floor with your arms stretched out directly overhead (like Superman flying, hence the name).

Raise your left arm and right leg into the air at the same time, also raising your chest slightly off the floor. Hold there for a second and squeeze the muscles of your lower back. Lower your limbs back to the ground then raise your right arm and left leg and hold for a second. You can push down with the hand that is on the ground to help raise your other arm and chest higher off the ground.

This exercise, even though it only uses your limbs as resistance, provides an excellent way to strengthen the lower back muscles.

Conclusion:

These two exercises will give you a good place to start with core training. You can begin improving your core strength by doing these exercises 3 times a week for 2 to 3 sets each. Make core training a priority in your exercise routine and you will rapidly reap the benefits of having a stronger, more injury-proof midsection and back.

------------------

Nick Nilsson has a degree in Physical Education and Psychology and has been innovating new training techniques for more than 18 years. Nick is the author of a number of bodybuilding books including "Muscle Explosion! 28 Days To Maximum Mass", "Metabolic Surge - Rapid Fat Loss," "The Best Exercises You've Never Heard Of," "Gluteus to the Maximus - Build a Bigger Butt NOW!" and "The Best Abdominal Exercises You've Never Heard Of", all designed to maximize the results you get for the hard work you put into your training.

Be sure to grab your FREE copy of Nick's 30-day "Dirty Little Secret Program for Building Muscle and Burning Fat FAST"

Wednesday, October 7, 2009

the "REAL" real truth about ABS


Ok, I know what you're thinking...

You're expecting me to say that the real "truth" to getting a lean, sexy 6-pack is to "burn off the fat", right?

You want to tell me that you "already HAVE a 6-pack" but it's just covered with a layer of blubber, eh?

Sure, that's what EVERYONE says, and it's TRUE...

...SORT OF!

You see, too many people have put in all the "hard work" to get to single digit body fat levels only to find that when the fat is
gone...

...their abs are still FLAT AS A PANCAKE!

================================

So here's the REAL "truth" about ABS...

================================

You actually have to HAVE "muscle" on your abs in order to achieve that lean, "ripped" look!

Plus, here's one more little "unknown" that will make getting a 6-pack EASIER...

You see, the amount of muscle you have on your abs will determine whether you start seeing your "pack" poke through at 10% body fat or 6% body fat.

And TRUST ME...there's a WORLD of difference in that 4% gap, as anyone who's ever tried to "diet down" to single digit body fat levels will tell you!

As far as I'm concerned, if I can look great at 10% body fat because my abs have more muscle and are more defined, then all the better...easier abs!

So you see, the key is to TRAIN your abs hard in the gym, just like ANY other muscle...with RESISTANCE!

Sure, there are a lot of machines you can find at your local gym that will target your midsection, but...

================================

Here's a "Quick Bodyweight Tip" For Training ABS...

================================

Most people are especially challenged with hitting their LOWER ABS.

This'll do the trick...

Find yourself a DECLINE BENCH and a bath-sized TOWEL.

Roll the towel up into about a cylinder, about 6 inches high.

Lay on the decline bench with your head toward the top and your legs straight with feet on the floor.

Place the towel from left to right under your lower back and grab the bench behind your head with both hands to gain leverage.

The towel increases the range of motion in your abs and ALSO gives you incredible lower ab activation.

Now, keeping your legs STRAIGHT, raise them in the air until you're in the shape of a "V" and breathe out forcefully at the peak contraction point.

Lower your legs SLOWLY but don't give them a break at the bottom.

Raise them back up in the air and continue back and forth until exhaustion.

When you're abs are toast, finish them off by bending your legs at the knees and doing "reverse crunches" in the same fashion, bringing your knees up toward your chest.

================================

Want even MORE "abs advice" + advanced training tips for EVERY MUSCLE?

Check this out:

==> http://www.musclenerdfitness.com

================================

Jason, CSCS

Monday, September 28, 2009

Quick Tip Could Mean $100


Quick CHEST TRAINING TIPS plus+ $100 for YOURS?

Hello

A buddy of mine, Jeff Anderson, you may have seen him and know him as the "Muscle Nerd", sent me over this email last night asking me to get the word out on some great training he has coming up this week. Plus he is willing to PAY YOU for taking part in the training!

It is not some rebate or discount it is cash given away.

I'm pasting a copy of the email he sent me below so you can check out all the details.

Here you go...

====== My Email From Jeff ======

Hey buddy, can you to do me a favor?

Muscle Specialization Secrets will be released, Monday, October 5th, and this will be my very LAST bodybuilding program.

Muscle Specialization Secrets is a unique training new method that will kickstart new growth even with the most FRUSTRATING muscle group and forcing it to respond. This full-blown MEGA PACKAGE reveals secrets I've fine-tuned over the last 4 years.

You name it, Chest...Back...Legs...Shoulders...Arms...Abs...

...ANY muscle will bend to your will!

Some pro bodybuilders and many of my training clients who needed to bring up lagging body parts have used these methods with great success.

Anyway, this is my first PHYSICAL product I'm putting out (DVD, Manual, buttload of CD's, etc.) and I wanted to see if you could help me get the word out, ok?

Would you mind sending out the following information to your newsletter subscribers to let them know?

You can just forward the information on to them so you don't even need to write anything extra.

LOTS of cool stuff for them beginning TONIGHT (including a chance to get paid $100 each night this week) so please let them know ASAP, ok?

Muchas gracias amigo! ;-)

Here are the details...

=========================================

1. 6 Nights Of A *LIVE* Online TV Show!

=========================================

Starting TONIGHT and every night after I'm broadcasting a LIVE TV show on a special "private access" blog I've set up just for the topic of "muscle specialization". On the live broadcast I'll be sharing my BEST TIPS for each muscle group, I will also answer questions and giving training advice.

The broadcast is private and everyone will need to get their free VIP ACCESS PASSWORD.
sign up at:

http://www.musclenerdfitness.com <= Click To Get Access

You can join in from ANYWHERE in the world and listen in for free using your computer's speakers or headphones. Each night covers a different muscle group so you'll definitely want to listen in (and watch)!

=========================================
2. Read Other People's Tips...Share Your OWN!
=========================================
I KNOW that there are a TON of "underground muscle nerds" out there who have been holding back on their own "secrets" they're using in the gym. Well, I want THEM to cough 'em up! Each day will cover a specific muscle group and I'm asking ANYONE who thinks they have some unique training advice to share to POST THEIR TIP ON MY BLOG. It can be... ==> Something you discovered on your own through your training

==> Something a friend or trainer showed you

==> Something you pulled out of a 1985 issue of Flex magazine

...I don't care!

If it works and it's "cool"...let us hear it!

PLUS, as my "thank you" for contributing...

=========================================

3. Each "Tip" Is An Entry To Get $100 Each Day!

=========================================

Each night, on my LIVE TV SHOW, I'm going to pull out of a hat the
name of someone who contributed a training tip.

The more tips someone submits, the more slips of paper with their
name on it in the hat.

Whosever name I pull out, I'm going to send that person a check
for 100 SMACKERS!

No strings attached...just grab my money and go!

6 muscle groups...

6 chances to offer as many tips as you like...

6 chances to take my money!

PLUS, for even MORE recognition...

=========================================

4. FREE eBOOK: "101 Bodybuilding Secrets"

=========================================

I'm putting together a special "compilation" book filled with the
most unique training methods I and my team of deputy "muscle nerds"
come up with.

If I choose one of your comments on the blog then I'll give you
full credit for submitting it.

You'll NEVER have to suffer a boring social life again when
everyone hears you're an "accomplished author" in a bodybuilding book!

Ok...probably not...but it may impress your parents! ;-)

The catch is, ONLY those who sign up for access to the blog will
get a free copy of the program!

So you MUST go and sign up NOW to contribute to, and GET a free
copy of, the upcoming book when it's released.

Just go to:

http://www.musclenerdfitness.com <= Click To Get Access

=========================================
5. "EARLY BIRD" Launch Headstart!
=========================================

My "Muscle Specialization Secrets" Mega Package goes LIVE at 12:00pm (noon) CSTD on October 5th. Since this is a giant box with: ==> Printed Manual

==> Workout DVD

==> 6 Audio CD's on "Muscle Specialization Secrets"

==> 12 Bonus "Best Exercises" Videos

==> Complete "Resources Disc" With 3-, 4-, and 5-Day Workout Routines

...I'm only going to have 500 boxes produced for the Oct. 5th
release!

(These things ain't cheap to have done professionally!)

When the site goes live at noon on Oct 5th, a TON of emails are
going to hit people's in-boxes (over 300,000 conservatively!)

BUT...those who sign up for the "Early Bird" notification and
VIP access to the private blog and TV show will get a 1-HOUR
HEADSTART if they want to order the program!

For all I know, we may sell out before we even go LIVE at noon,
but the "early birds" will have first shot at getting a box.

To get on the "Early Bird" list for the special email at 11:00am Oct. 5th
(1-hour advance notice), you'll have to sign up at:

http://www.musclenerdfitness.com <= Click To Get Access
=========================================
I look forward to hearing from you in the V.I.P. training! Your "Champion For The Average Joe", The "Muscle Nerd" Jeff Anderson

Monday, May 25, 2009

Increase your Bench by 50lbs


Stay tuned as in the near future I will be doing an interview with the author of
"How To Increase Your Bench Press By 50 Pounds in 10 Weeks!"


If there are any questions that you would like answered just leave a comment below and i will take a look at them and pass them on.

Tuesday, March 17, 2009

TRX Workout video

Sample TRX Exercise

Fitness Anywhere

Functional training originated as a form of injury rehabilitation with exercises that are relevant to the movements of everyday life. Many traditional workout programs limit performance in specific hobbies, sports or daily movements, but functional fitness develops basic motor patterns to work at a higher capacity. Each functional exercise uses complete muscle activation and a purposeful movement pattern which allows for maximum strength gains.

Traditional weight training often only works one muscle at a time which is contradictory to the normal coordinated effort used to complete most activities. This type of training is more likely to lead to overuse injuries, muscular imbalances, and limit movement and strength gains.


Fitness Anywhere Video

Sunday, December 9, 2007

Olympic Weightlifting Technique - Learn the Snatch


Weight Training Journal


I found this video on YouTube and thought I would share it with you. The quality is not great but the information is fabulous. The video is a little old as it was filmed at the Arnold 2005 weightlifting event.

Three time Olympic Games coach, World and Olympic weightlifting champion Tommy Kono, presents a lecture on the proper way to perform the weightlifting movement known as the Snatch. To the left is a picture of him.

There are 2 parts to the lecture. This is part 1.


All the best in your weight and programs.
Jason, CSCS

Monday, September 17, 2007

Training to Get Weaker

Weight Training Journal

Two Weeks to Weakness


You may not hear of many people looking to decrease performance in the weight room but my goal over the next two weeks is to lose strength. I want all numbers in all lifts to decrease, the weaker I am the better. Over the next two weeks my objective is to complete 18 very tough workouts. I want to place myself in a position of benign overtrained.

PLANNED training to this extent is referred to as overreaching, or supercompensation. The important aspect of this principle is to stress the body above what you can take then REST. If a athlete or weightlifter refuses to rest disaster will strike. A chronically overtrained person is likely to get injured, sick, mentally breakdown or all of those. So with overreaching, or supercompensation it is vital that trainees rest.

Gains in strength and size are not made in the gym. In fact working out tears muscles apart, the body is breaking down. Gains are made only when the body rests and receives proper nutrition. The food and resting allows the body to heal, grow, and adapt to the stress it has experienced in the gym or on the playing field. Without proper sleep and nutrition all the time in the weightroom is a waste.

Without proper rest and nutrition you will enter a state of overtraining. This condition is not desirable and can take a long time to recover from and can ruin a career . Overreaching is beneficial helping some breakthrough plateaus and only requires a few days to a week to recover from.

For the next two weeks I have planned to overreach, then take a week off to rest and recover then return to the gym the following week and see new gains in all my lifts. I am not looking forward to the next two weeks as I am sure it will hurt, but I am looking forward to the results that will follow.

All the best in your weight and programs.
Jason, CSCS

Thursday, August 30, 2007

Building a Big Back

Weight Training Journal

Weight Lifting and Bodybuilding Tips & Articles

It is hard to see the back muscles in action and this often makes it a hard body part to train. Training the back requires extra concentration and care to develop properly. Below are a few tips that may help your back workouts add the thickness and width you are looking for.

1 – Ensure you get full extension of the muscle, stretch at the bottom of the motion. Make sure you allow the elbows to fully extend of at the start, or top. A bent arm means you are cheating. If you have a tendency to cheat completely relax and rest for one second at the starting position, then precede with your next rep.

2 - Squeeze at the midpoint, or the fully contracted position. This ensure you are targeting the muscle and working the desired area.

3 - Pull with the elbows, not the hands. Doing this will help place more emphasis on the back and reduce the contribution of the arms.

4 – If you can not hold the weight in the fully contracted position for 2 seconds the weight is too heavy. This often happens with seated rows, people use their legs and low back jerking the weight into position and end up not working the targeted muscles.

Keep these points in mind and your back will grow wide and thick.

All the best in your weight and programs.
Jason, CSCS

Sunday, July 15, 2007

King of the Posterior Chain

Weight Training Journal

Weightlifting Article


If you do not have the Romanian dead lift, also called keystone dead lifts it is time rewrite your weight training program and add this great lift into the mix. Most people working out legs do plenty of quad dominant exercises, maybe too much. Far too few lifters balance that out with hip extensor dominant exercises, do you do? For those who do not know the difference between the muscle actions and the predominant exercises for the both will have to stay tuned to later posts.

Romanian dead lifts are neither deadlifts nor Romanian, but they are an excellent exercise for the posterior chain, mainly focusing on the hip extensor muscle groups, the hamstrings and glutes.


Proper technique for the RDL

You grip on the bar will be shoulder width or slightly wider depending on what you find more comfortable. Feet are shoulder width apart, chest is up, your lower back has a slight lordotic curve, and your knees are slightly bent. Tighten your core muscles, the abs and lower back ensuring a secure spine. As you begin the motion keep the bar close to your body, push the hips back maintaining a tight core.

As you descend keep your weight on your heals while the butt continues to move back you will begin to feel a stretch in the hamstrings. Continue to lower the bar as long as you can maintain a tight core. Stop just before the form breaks and pause for a second or two here at the bottom position before you reverse the movement. As you approach the top of the movement really force the hips through be squeezing the glutes. There it is one rep of the RDL.

The biggest mistake with the execution of this exercise is not maintaining the position of their lower back. Only go as far as you can with proper form.

Add the RDL to your workout and watch your hamstrings and glutes grow.


All the best in your weight and programs.
Jason, CSCS

Pike Handstand Push-Ups and Horizontal Push-Ups

Weight Training Journal

Free Articles

The handstand push-up is simply one of THE very best shoulder
exercises in existence. It's also one of the hardest! Learn
two variations of this exercise that allow you to reduce the
resistance but still harness the full power of this single-best
bodyweight shoulder exercise.


When it comes to shoulder training, nothing beats the handstand push-up for sheer shoulder-building power. To do the handstand push-up, you need to kick up into a handstand (generally with your feet touching a wall), lower yourself down like a shoulder press, then push yourself back up. All of this performed upside down with your entire bodyweight for resistance!

But the bottom line is, as effective as it is, the handstand push-up is also one of the hardest and most dangerous exercises to perform! If you don't have the strength to perform it correctly, it'll drop you right on your head, which is rarely a good thing.

So how do we harness the shoulder-blasting power of the handstand push-up while not only keeping it safe but also adjusting the resistance so you can perform it (or variations of it) no matter what your strength level?

Two ways. The first is the Pike Handstand Push-Up (for intermediate to advanced trainers). The second is the Horizontal Push-Up (for beginning trainers).


The Pike Handstand Push-Up

This exercise is performed almost exactly like a regular handstand push-up with one major difference...instead of going up into a full handstand, you set your feet on a bench and bend your body in half at a right angle (pike position). In that position, you perform the push-up.

To get into position, all you need is a bench, a chair or some steps. Set your hands on the ground a little beyond shoulder width apart and about 2 feet in front of the bench. When your hands are planted, step back and up and set your toes on the bench. Bend only at your hips so your body forms an upsidown "L" shape.

When doing this exercise, your fingers should be spread wide for best stability. Look directly back and underneath the bench in order to keep your torso vertical. If you try and look forward, you'll change the focus of the exercise and possibly plant your nose into the floor.

Lower yourself down just like you were doing the negative of a shoulder press. Touch your head lightly to the ground then press yourself back up.

Because your lower body is supported on the bench, this reduces the resistance that your shoulders must work against, allowing you to reap the benefits of the handstand push-up movement without being forced to use your whole body as resistance.

As you get stronger with the movement, you can set your hands on two push-up handles or on the handles of two dumbbells (use hex dumbbells so that they don't roll out on you). This will give you a somewhat greater range of motion and further develop the shoulders.

Even though this exercise is an easier variation of the handstand push-up, you still need to be careful about balance and about being upside down while exerting yourself. Do only a few reps the first time you try it and stand yourself back up slowly.


Horizontal Push-Ups

This exercise is ideal if you're not strong enough to perform the Pike Handstand Push-Up but are looking for a good bodyweight shoulder exercise. This one of only a very few bodyweight exercises available for the shoulders, especially if you are newer to training.

The Horizontal Push-Up utilizes a similar movement pattern to the handstand push-up but with a horizontal body position instead of a vertical body position. This means you're moving primarily forward and back, not up and down.

To perform this exercise, it's best to use two pieces of equipment (e.g. two benches) or furniture (e.g. two chairs). The reason for this is that ideally you want to have room for your head to go down the middle so you get a full range of motion. It is possible to do this exercise using the edge of a single bench by ducking your head under the bench as you do it.

Note: normally I don't recommend exercises that put resistance on the shoulders with this "behind-the-head" position but in this case, because it's a bodyweight exercise with small resistance, you can very easily adjust your shoulders to accommodate the movement without a problem. You can also simply touch the top of your head to the bench edge instead of going under it and do a shorter range of motion.

In the demonstration pictures and video, I'm going to be using the "Lebert Equalizer" that I reviewed in the previous article (see above).

Brace your equipment against a solid object or wall for support and you're ready to go!

Kneel down about a foot in front of the equipment. The two pieces should just a little outside shoulder width apart. Set your hands on the corners of the two pieces and set your torso horizontal. Now use your legs to push your body forward.

This mimics the lowering phase of a shoulder press. When you get to the fully stretched position, use shoulder power to press yourself back to the start while using pressure from your quadriceps to resist the movement.

To increase the resistance on this exercise, get on your feet! Instead of kneeling down, set your feet about a yard away from your apparatus then perform the exercise exactly as above.

This exercise is ideal if you're just starting out in your training and working out either at home or in a gym.

The full Handstand Push-Up still reigns supreme as the king of the bodyweight shoulder exercises. But these two variations will go a long way towards helping you develop the shoulders you want, whether it be giant barn-door shoulders or tight, toned shoulders with great definition.

For pictures and videos of these two exercises in action, click

------------------

Nick Nilsson is Vice-President of the online personal training company BetterU, Inc. He has a degree in Physical Education and Psychology and has been inventing new training techniques for more than 16 years. Nick is the author of a number of bodybuilding eBooks including "Metabolic Surge - Rapid Fat Loss," "The Best Exercises You've Never Heard Of," "Gluteus to the Maximus - Build a Bigger Butt NOW!" and "The Best Abdominal Exercises You've Never. He can be contacted at betteru@fitstep.com.


All the best in your weight and programs.
Jason, CSCS

Friday, April 6, 2007

Learn to Squat

Weight Training Tips


Squatting is an essential component of any weightlifters training. If you do not have the squat in you weight training program you do not have much of a weight routine because it may be the the single best exercise for leg strength and development. Many people shy away from the squat for a host of reasons:
it is bad for you
it is difficult and dangerous
it is bad for your knees and back
and on and on

If the squat is taught incorrectly, or not at all which is common it can be dangerous and intimidating, but done properly the squat is a safe and effective exercise.

Squatting significantly strengthens many muscles in the body particularly the muscles responsible for knee and hip extension, which include the quadriceps, hamstrings, and glutes. In addition to lower body strength a great deal of the smaller stabilizing muscles are necessary such as the core musculature.


I think one of the most important points in the video is in regards to posture and load. If you cannot maintain proper aliment of the spine stop and reduce the weight. Many people use too much weight when they squat this limits range and often causes mechanical flaws.

Included is a video on proper back squat technique. The author of the video is a Certified Strength and Conditioning Specialist and an Olympic Weightlifting competitor at the Master's level.

Only use a belt for near max and max lifts. Do not use a belt as part of your warm up. I have seen so many high school kids do this and the coaches are just setting their kids up for problems. A belt is for max and near max lifts only.

Enjoy


All the best in your weight and programs.
Jason, CSCS

Monday, April 2, 2007

How to REALLY Do Incline Curls To Mass Up Your Biceps FAST

Weight Training Tips


The Incline Curl is one of THE most effective bicep-building exercises you can do. It puts a great stretch on the biceps at the bottom and can be a key exercise for major muscle growth.

And the standard way of setting up and performing the Incline Curl is just fine! There's nothing inherently wrong with lying back on an incline bench, letting your arms hang down beside you then curling the dumbbells up to the top position.

This "normal" way of doing the Incline Curl is very effective and time-tested. But you're NOT reading this article because you want to settle for "normal" results!

So here's the simple technique for maximizing the results you get with the Incline Curl...

You're NOT going to sit on the seat of the incline bench as you normally would. First, pick up your dumbbells and straddle the incline bench. In that standing position, move your butt all the way back onto the bench. Sit on the incline face of the bench then set your FEET on the seat of the bench (knees bent).

The top end of the bench should hit you just below the shoulder blades. Now arch your back over the top end of the bench as though you were trying to wrap your back over and around the bench end. Turn your palms forward and keep them facing forward throughout the exercise for best results. In this bottom position, you should feel an increased stretch on the biceps beyond what you normally get with the Incline Curl.

The reason this position results in an increased stretch on the biceps lies in the positioning of the chest and shoulders. The biceps attach in the shoulder joint. When you're in the standard position on the incline bench, your shoulders are braced on the bench and you can't fully open up your chest.

You do get a good stretch but it's not a MAXIMUM stretch, which is the key to massive results with this exercise!

When your shoulders are up and off the top end of the bench, the weight of the dumbells pulls your shoulders back and down, opening up the chest and increasing the stretch on the biceps at the bottom.

Perform the exercise as you normally would an Incline Dumbell Curl. Start the movement with a deliberate squeeze of the biceps, curl all the way up to the top, doing your best to keep the upper arms vertical (they may move up and forward a bit). Hold for a second at the top.

Now comes the payoff...on the way back down, DO NOT let your palms turn inwards. Keep them facing FORWARD all the way down to the bottom. This keeps full tension on the biceps all the way to the bottom, which is the most beneficial part of the exercise.

Lower the dumbells under complete control. For an extra shot of tension, try to "push" your elbows forward as you lower the dumbells. To do this, imagine as though you're trying to push a button with your bicep - it takes a bit of practice to get this feeling but it's definitely worth persuing.

As you lower the dumbells to the very bottom, let them pull and stretch your shoulders backwards and down, opening up the chest. This increased tension from the negative portion of the movement coupled with the greater stretch potential of your body position will give you an INCREDIBLE muscle-building stimulus. Take advantage of it and don't lose the stretch tension in your biceps!

Feel for that stretch then curl up again with a deliberate movement. When you go to choose weights for this exercise, start with weights that are lighter than you would normally use. When you apply stretch and tension to the biceps like this, it's a humbling experience in terms of the amout of weight you can use.

But it is definitely a GROWING experience!!

For pictures and video of this technique in action, click on the following link:

http://hop.clickbank.net/?jasoncscs/betteru&l=1114

------------------

Nick Nilsson is Vice-President of the online personal training company BetterU, Inc. He has a degree in Physical Education and Psychology and has been inventing new training techniques for more than 16 years. Nick is the author of a number of bodybuilding eBooks including "Metabolic Surge - Rapid Fat Loss," "The Best Exercises You've Never Heard Of," "Gluteus to the Maximus - Build a Bigger Butt NOW!" and "The Best Abdominal Exercises You've Never Heard Of" all available at (http://hop.clickbank.net/?jasoncscs/betteru). He can be contacted at betteru@fitstep.com.


All the best in your weight and programs.
Jason, CSCS

Tuesday, March 13, 2007

Suitcase Deadlifts

Weight Training Tips

Looking for an exercise in the weight room that will tighten up your waist,
build a rock-solid core and improve grip strength?
Try Suitcase Deadlifts, they are functional and challenging.

The Suitcase-Style One Arm Deadlift is one of the most powerful, results-producing exercises you will NEVER see anybody in the gym do until you actually do it yourself! The reasons? First, it's NOT a common exercise, even though it's been around for many years. Second, it's a tough exercise to do! But as you know, the toughest exercises are always the most productive.

The Suitcase-Style One Arm Deadlift places extreme torque on the core and will help you develop an incredibly tight and powerful midsection. Basically, instead of using both arms and doing a barbell deadlift in front of your body as you normally would, you'll stand BESIDE the barbell and pick it up with one arm.

Imagine reaching down and picking up a suitcase sitting beside you. That's the Suitcase-Style One Arm Deadlift but, of course, using a heavy barbell!

There will be a link to pictures and a video of this exercise in action at the end of the article.


How To Do It:

First, if you're doing this exercise off the floor, load a barbell with a 45-lb plate on either end. To lift this amount of weight, you should be able to deadlift at least 250 to 275 lbs in a normal deadlift.

If you wish to use less weight for this exercise, set the safety rails in the power rack to just below knee height and load the bar with however much weight you want to use. The reason you'd want to use the rack is, because you're using smaller plates, the bar will start too low to the ground and you'll need to lean over too much to the side to pick it up.

Stand beside the barbell and reach down and grasp it with one hand. When you do the One-Arm Deadlift, you should grip the bar slightly off-center. Your thumb and index finger grip should be about a centimeter (about a half inch or so) from the edge of the center grip surface. This uneven grip will prevent the bar being lifted unevenly and tilting as you are lifting.

The reason for this is that when you grip the bar with one hand, your thumb and forefinger grip area become the main pivot point. If that main pivot point is not close to the real center of the bar, the bar will tilt when you pick it up. By sliding your hand down so that your thumb and forefinger grip area is closer to the real center, you will have a much easier time keeping the bar level.

Before you pick up the bar, make sure your shoulders are level and your entire core area is tightened up very strongly. Pick up the bar, focusing on keeping your shoulders level as much as possible. The weight of the bar on the one side will place an EXTREME stabilizing load on the other side of the body. You will be pushing HARD with the same side foot as you're pulling on the bar, e.g. if you're picking the bar up with your right arm, you'll be pushing hard with your right foot.

Keep your lower back tight and arched as you stand up. Come all the way up to the top position and hold for a few seconds then lower the bar back down slowly. Gripping the barbell with one arm in this fashion is also VERY challenging to the grip. You'll need to hold on tight in order to keep your grip on the bar.

Set the bar down on the floor between reps and relax the core. Re-tighten everything then start your next rep. This exercise should only be done for low reps, e.g. 3 to 5 reps per set. Any more than that and the stabilizing muscles of the abs will become fatigued and cause the torque to go into the lower back instead of the abs, where you want it.

The first time you do this exercise, start with a conservative weight. It's deceptively tough, especially if you've not done a lot of movements that are weighted on only one side. The torque on your core will be a very new thing! The incredible tightness you'll feel all along your side abs the next day will show you just how effective this exercise is.

If you're a strong deadlifter or find your grip strength limits the amount of weight or number of reps you can do, I would DEFINITELY recommend grip assistance in the form of either lifting straps or a product called "1 Ton Hooks." The grip assistance will allow you to use heavier weight and hold onto it longer. It will also prevent the bar from rolling out of your fingers as your grip fatigues.

I would recommend the hooks over the straps in all cases. "1 Ton Hooks" are cast iron lifting hooks that are designed to allow you to hold extremely heavy without worrying about your grip strength. These hooks, in my opinion, should be in the arsenal of EVERY serious lifter and I highly recommend them. To put it in perspective, I've used these hooks to do partial deadlifts with more than 900 lbs and the hooks held up fine!

You can read my full review of "1 Ton Hooks" here:

http://hop.clickbank.net/?jasoncscs/betteru&l=1099


Give the Suitcase-Style One Arm Deadlift a try in your next back workout - I can promise you'll either be thanking me or cursing me for the next two days after you do it! Your entire core will be worked in a way it has NEVER been worked before.

For pictures and a video of this exercise in action, click the following link:

http://hop.clickbank.net/?jasoncscs/betteru&l=1098

------------------

Nick Nilsson is Vice-President of the online personal training company BetterU, Inc. He has a degree in Physical Education and Psychology and has been inventing new training techniques for more than 16 years. Nick is the author of a number of bodybuilding eBooks including "Metabolic Surge - Rapid Fat Loss," "The Best Exercises You've Never Heard Of," "Gluteus to the Maximus - Build a Bigger Butt NOW!" and "The Best Abdominal Exercises You've Never Heard Of" all available at (http://hop.clickbank.net/?jasoncscs/betteru). He can be contacted at betteru@fitstep.com.


All the best in your weight and programs.
Jason,CSCS

Saturday, February 10, 2007

Cable-Barbell Curls -

Hybrid Training For Incredible Biceps!


By Nick Nilsson

The standard barbell curl is NOT the most efficient way to
build massive biceps. With this Hybrid Training exercise,
you're going to learn how to add additional targeted resistance
to the barbell curl to hit the biceps MUCH harder and build
more muscle faster!


Want to build muscle faster? "Hybrid Training" is a powerful new concept in weight training that combines TWO separate forms of resistance into ONE single exercise to dramatically increase the muscle-building power of both!

After releasing the full "Hybrid Training" book in Novemeber, the response has been just tremendous! But for those who want to experience this extraordinary technique for themselves before unleashing the full power of ALL the exercises in the book, I've decided to go ahead and turn a sample exercise loose!

This exercise is the Cable-Barbell Curl and it's going to turn your biceps into mush and then into mountains!


So What is "Hybrid Training?"

"Hybrid Training" is a technique that allows you to use TWO distinct forms of resistance in ONE exercise. Why is that good? Because standard exercises have limitations due to your body's biomechanics.

When you do a barbell curl, you can only use as much weight as your biceps can handle IN THE WEAKEST PART of the exercise, which is when your elbows are bent 90 degrees.

So if you're only use as much resistance as you can handle when your muscles are at their weakest, don't you think you're shortchanging yourself when it comes to strength and muscle-building?

With this "Hybrid Training" exercise, you're going to dynamically alter the resistance AS YOU'RE DOING THE EXERCISE. When you start, you'll be curling the barbell as usual. But the moment you pass that "weak point" and your biceps are mechanically stronger, the resistance will INCREASE, dramatically ramping up the muscle-building power of the exercise.

This will happen because you will be attaching a cable (or elastic training band) directly to your barbell. I'll give you detailed instructions on how to do that after you learn how to perform the exercise.

This combined targeted resistance means you'll be matching the actual strength curve of the barbell curl MUCH closer (using more resistance when the biceps are in a stronger position). This means MORE muscle growth and more strength because you're pushing biceps to the limit through a MUCH greater range of motion.

How To Do It:

First, you will attach a low-pulley cable to the EZ bar or regular straight barbell (this is explained in detail below). Reach down and pick up the bar, taking a shoulder-width grip on the bar. Use a light to moderate weight on the bar and a light weight on the cable machine - you'll know why you need to start light after doing a few reps of this!

Now take a big step back. This big step changes the angle of resistance that the cable will provide. Rather than pulling it straight up and down, you'll be pulling it up and back.

This is more effective because the barbell curl is NOT a straight up and down movement but is actually an semi-circular arc type of movement. Pulling the cable up and back means you're pulling directly backwards towards your face. In the standard barbell curl, you get NO backwards-pulling tension at the top and have to focus on squeezing the biceps hard yourself. With this direct angled tension, you simply won't have a choice and the tension stays on HARD!

Now begin the curl movement. Keep your knees slightly bent, your core tight and your head looking straight forward. Because of the cable pulling you forward, you will need to lean back a little as you perform the exercise.

During the first 2/3 of the range of motion, the cable is not actually moving very much. But as you come towards the top 1/3 of the range of motion, you'll notice the cable curl portion kicking in MUCH more.

As you come to the top, as I mentioned above, you're actually pulling the cable directly towards your face, dramatically increasing the tension on the biceps at the top. This is very useful because you get increasing resistance only AFTER the sticking point (the weakest point) of the exercise.

The biceps are biomechanically stronger in this top range of motion and can handle (and will thrive on!) the increased resistance that you're providing them.

Hold for a 2 count at the top, squeezing the biceps hard, then lower slowly. Repeat for as many reps as you can do with good form then adjust the weight for your next sets, if you need to.


How To Do This Exercise With Bands:

This exercise can also be done using a band attached to a solid object in front of you and looped around the bar (explained below). Use a light-tension band the first time you do this exercise to get a feel for how it's done.

Here's a link to a site where you can get high-quality training bands for great prices. Bands are especially useful if you're training at home and don't have access to cable equipment. I HIGHLY recommended these bands as training tools. They're very versatile and incredibly effective.

http://www.fitstep.com/goto/ironwoody-bands.htm

Now, take a big step back to get some tension on the band at the start of the movement. Perform the curl exactly as described in the previous exercise, bringing the barbell towards your face and squeezing hard at the top. The increasing tension in the band puts a powerful contraction on the biceps at the top.


How to Attach the Cable To the Barbell

It's a very simple process to attach a cable to a barbell. All you need to do is loop the cable around the bar and clip it back onto itself. There will be pictures of this process at the link below.

- First, get the barbell set up and place it in front of the cable to be used.
- Next, pull the cable out and loop it once around the bar (in the very center)
- Clip the cable right back onto itself at a point right next to the bar (the weight on the cable stack will automatically tighten up the loop)

The only downside to this setup is that the cable may slide around on the surface of the bar if the bar tilts during the exercise as it has nothing to grip on. If you have a small towel, you can very easily place this on the bar first, then loop the cable on top of the towel. This will help keep the cable from moving or sliding around on the bar.

As a general point, you will almost ALWAYS use less weight on the cable than you will on the barbell. For example, when doing cable-barbell curls, you may use 70 lbs on the bar and 30 lbs on the cable.


How to Attach Bands

To use a band with this exercise, you just need something solid to anchor the band onto. This can be a weight machine or a railing or even a dresser leg at home! It just needs to basically be an immovable object.

It's a simple process to securely tie the bands onto a rail or post - you will use what is called a bale hitch. And you don't need to be in the Navy to figure out how to use it!

To do the bale hitch, loop the entire band around the solid object. You have the two ends in your hands. Now pull one end through the loop of the other end. When you pull that end all the way through so the loop tightens up, it creates a secure hitch.

Make this attachment low to the ground for the band-barbell curl. For the barbell, just loop the other end around the barbell and move it to the very center of the bar. There's no need to hitch it onto the barbell - the tension on the band during the exercise will keep it in place.

---

Conclusion:

The first time you perform this exercise, get ready for an eye-opener! It may not look like you're using much weight on the bar or on the cable but the combined result is huge. The difference in the critical muscle-building tension on the biceps is astonishing!

Give this exercise a try in your next bicep workout. Then imagine the results you can get in your ENTIRE BODY when you put the full power of "Hybrid Training" into effect on every single bodypart!

To view pictures and video of this exercise in action and to see how to attach cables and bands to barbells, click on the following link:

http://www.fitstep.com/Misc/Newsletter-archives/issue48-hybrid.htm

And to learn more about "Hybrid Training" and grab your copy of the full book, click here now!

http://www.fitstep.com/hybrid-training/hybrid-training.htm

------------------

Nick Nilsson is Vice-President of the online personal training company BetterU, Inc. He has a degree in Physical Education and Psychology and has been inventing new training techniques for more than 16 years. Nick is the author of a number of bodybuilding eBooks including "Metabolic Surge - Rapid Fat Loss," "The Best Exercises You've Never Heard Of," "Gluteus to the Maximus - Build a Bigger Butt NOW!" and "The Best Abdominal Exercises You've Never Heard Of" all available at (http://www.fitness-ebooks.com). He can be contacted at betteru@fitstep.com.

Friday, May 5, 2006

One Arm Barbell Press


One Arm Barbell Press

The one arm barbell press is an excellent exercise to strengthen more than your shoulders. I picked up the one arm barbell press from Pavel Tsatsouline, author and more notable promoter of kettle bell training. This exercise is great to include in your shoulder workout. Do this for a while and you will see how to get muscles fast.

The exercise it pretty basic, load a barbell and with one arm do a press. The trick comes with keeping the bar balanced and your body erect. In addition to a great shoulder workout you'll also be improving your grip, coordination and core strength.

To make the exercise a bit more challenging you can adda twist to the movement. This will work the oblique muscles dynamically as opposed to statically. The other thing you could try is to do so on one foot or a bosu or even one foot on a bosu.

Take a look at the photos to see my start and finish position.


All the best in your weight and programs.
Jason

Saturday, April 29, 2006

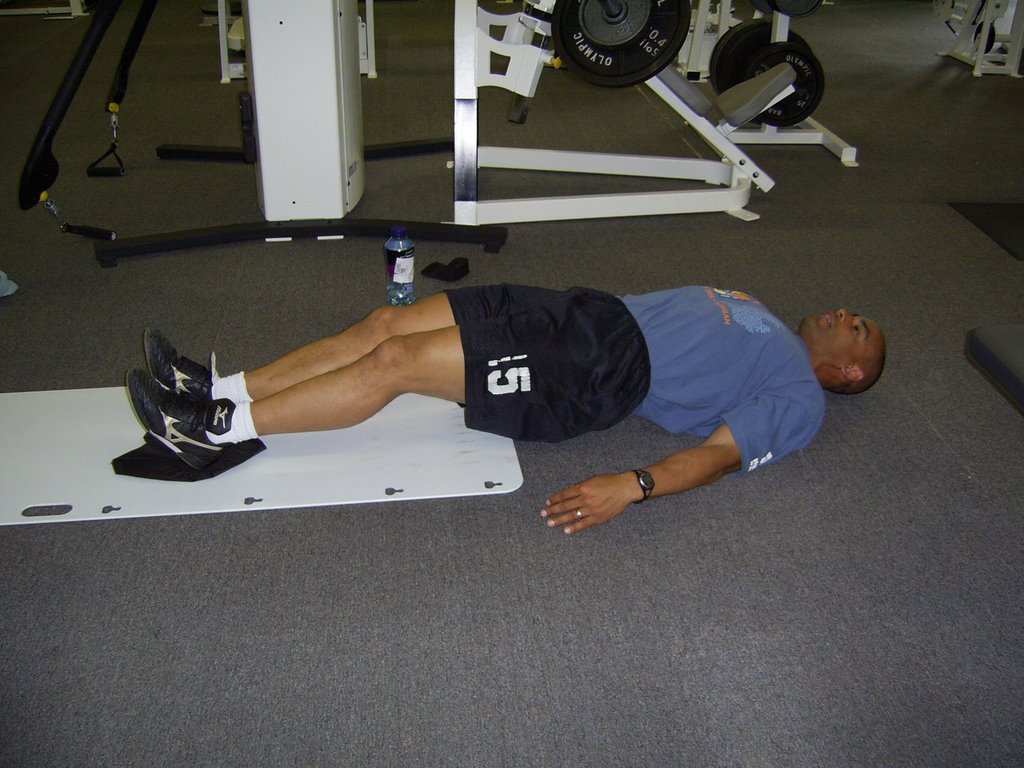
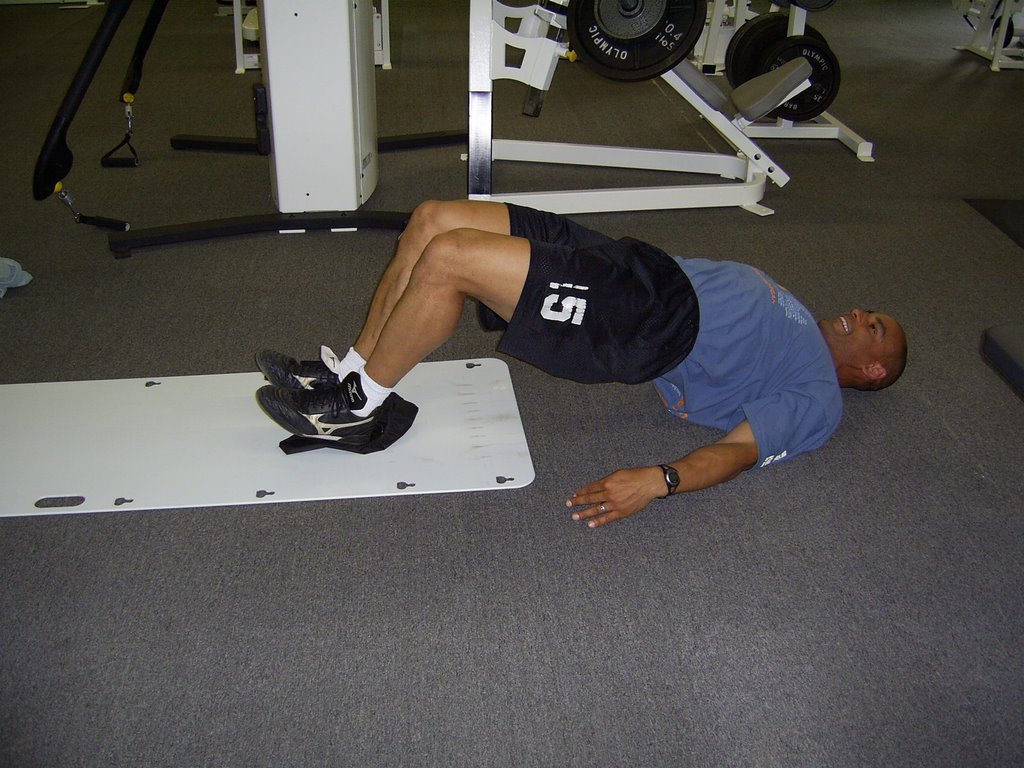
Supine Slide Board Hamstring Curls

Slideboard hamstring curls


This is the start, or bottom position. Make sure your hips are up.


This is the top or finish position, again keep the hips high.

To get to the finish position flex the hamstrings. Have your weight on your heals and flex bringing your heals to your but.